Model Aces specializes in building authentic-looking, museum-quality scale model replicas of actual WW II aircraft. Because of this, we often have to start with an off-the-shelf kit and customize it with aftermarket detail kits, also called upgrade kits. These kits include resin, “brassin”, photo-etched and vacuum-formed parts. In this article, we are going to summarize the use of resin and brassin parts. We’ll touch on the high points, but for an excellent, detailed tutorial with great pictures, we recommend chapter 7 of “Building and Detailing Model Aircraft“ by Pat Hawkey.
Out-of-the-box model kits and upgrade kits are not perfect or might not be the version of aircraft that you want to build. Rely on your own research to decide what aftermarket kit parts, if any, you want to add to your kit to achieve the level of authenticity that you seek. As part of your research, it is helpful to read kit reviews to get a better understanding of various kits’ strengths, weaknesses and what pitfalls to avoid.
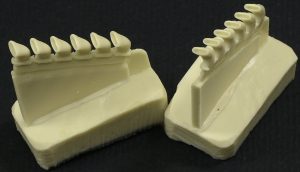
Most scale model aircraft kits today are made from a plastic called polystyrene. As you get more experience, you will encounter different materials including resin which is probably the second most popular medium. “Brassin” upgrade kits contain both resin and brass parts that are tightly integrated to deliver subassemblies with fine detail. The advantage of resin parts is that they tend to have a much higher level of detail than polystyrene. Unlike polystyrene parts which you simply snip from their sprue and add to your model with little cleanup, a downside of resin parts is that they tend to require more work to extract and prepare. Resin parts are made by mixing two liquids that are then poured into a rubber-like mold. When the resin hardens, the molds are peeled back to release the part and excess material called the casting block or “foot”.
Resin parts must be carefully cut from their foot. If the attachment to the foot is thin, it will probably be possible to cut the part free with repeated passes of a sharp hobby knife. However, if the attachment is thick, you should consider using a razor saw. Razor saws are designed for hobbyists. They are available in different depths and have fine teeth. Note that hobby razor saws are usually different than what you can purchase at a hardware store, as hardware store saws usually have teeth that are too course. Sometimes you may need to use a combination of tools to prepare a resin part. I typically rough cut them from their foot using a razor say. When free, I use a modeling knife and sanding stick or block to precisely trim and clean the part.
Note that the find dust produced from sanding resin can be hazardous. Be careful not to breathe it and consider using a dust mask.
Another potential downside of resin parts is warping. Check your parts to make sure that they are not deformed or warped. Sometimes you can realign the part by applying low heat from boiling water or a heat gun. Another potential problem with resin are tiny holes (pinholes) that can form on the surface from air bubbles present while the resin was hardening. These can usually be eliminated by filling and sanding. However, note that fillers made for styrene will not adhere to resin. It is best to use an appropriate epoxy filler.
To attach resin parts, you should use either superglue (cyanoacrylate) or epoxy. Polystyrene cement will not work on resin because it works by slightly dissolving the polystyrene parts creating a “solvent weld”. It does not react with resin.
Thank you for the excellent explanation of resin parts. I’m somewhat new to the hobby and did not realize special cement is necessary. You saved me from a got cha! Thanks again.
Hi, Would you consider making a 1/48 YB-40 conversion? The old Paragon kit is long out of production. Thanks!!! Bob